How to Connect a Chimney Liner to a Stove or Insert
Last updated: November 16, 2026
Quick answer: connect a chimney liner to a stove or insert by matching the liner to the right adapter, locking the connector pipe to the stove collar or insert collar, and sealing one tight metal joint so exhaust cannot leak back into the room. If the appliance is a wood stove or fireplace insert, the connection usually ends at a stove collar, appliance collar, tee, or tee connector, not just a loose pipe end. This article is about how to connect a chimney liner to a stove or insert.
Key takeaways
- The liner connection is a fit-and-seal job, not a place to improvise with gap filler or tape.
- The right adapter depends on the appliance collar, a stove, or a fireplace insert, and on whether the liner drops straight down or uses a tee.
- A tidy connection should leave the cleanout access reachable and the connector pipe seated fully.
- A bad connection usually shows up as smoke smell, loose joints, soot streaks, or a cap that is hard to service.
- If the liner, collar, and connector parts do not line up cleanly, the fix is usually the adapter, not more sealant.
How do you connect a liner to a stove?
You connect a chimney liner to a stove by fastening the liner to the correct stove adapter, then joining that adapter to the stove collar with the proper connector pipe and sealant. The goal is a tight metal-to-metal joint that stays serviceable and does not block the cleanout access or the stove’s own flue path.
- Measure the stove collar or insert collar opening and the liner end so the adapter matches the parts already in place.
- Select a stove adapter, tee connector, or appliance collar that fits the appliance and the liner style.
- Dry-fit the connector pipe to the stove collar before any sealant goes on, so the run sits straight and the joints line up.
- Attach the adapter to the liner with the fasteners or locking method made for that liner system.
- Apply sealant at the joint only where the liner system and appliance connection call for it, not as a substitute for a bad fit.
- Tighten the connector pipe and any screws so the assembly does not wobble when the stove door opens or closes.
- Check the cleanout access and the visible seams for gaps, misalignment, or places where soot can escape.
The connection that works best is usually the one that looks simple after the parts are fitted correctly. A connector pipe that sits centered on the stove collar and an adapter that matches the liner end usually give a cleaner result than forcing a mismatched part together.
Which adapter fits a stove collar or insert collar?
The right adapter is the one that matches the appliance collar shape and the liner end, not just the nominal pipe size. A wood stove often uses a straightforward stove adapter, while a fireplace insert may need a tee connector or appliance collar to bridge the offset from the fireplace opening to the liner.
| Part | Where it is used | What it does | When it is the better choice |
|---|---|---|---|
| Stove adapter | Wood stove | Joins the liner to the stove collar | When the flue exits directly from the appliance |
| Appliance collar | Fireplace insert | Creates the appliance-side connection point | When the insert has a specific collar or throat opening |
| Tee connector | Liner with rear exit or cleanout need | Turns the connection and preserves access | When the liner must connect behind an insert or through a rear outlet |
| Connector pipe | Stove or insert run | Carries exhaust between collar and liner connection | When the connection needs a short, direct run |
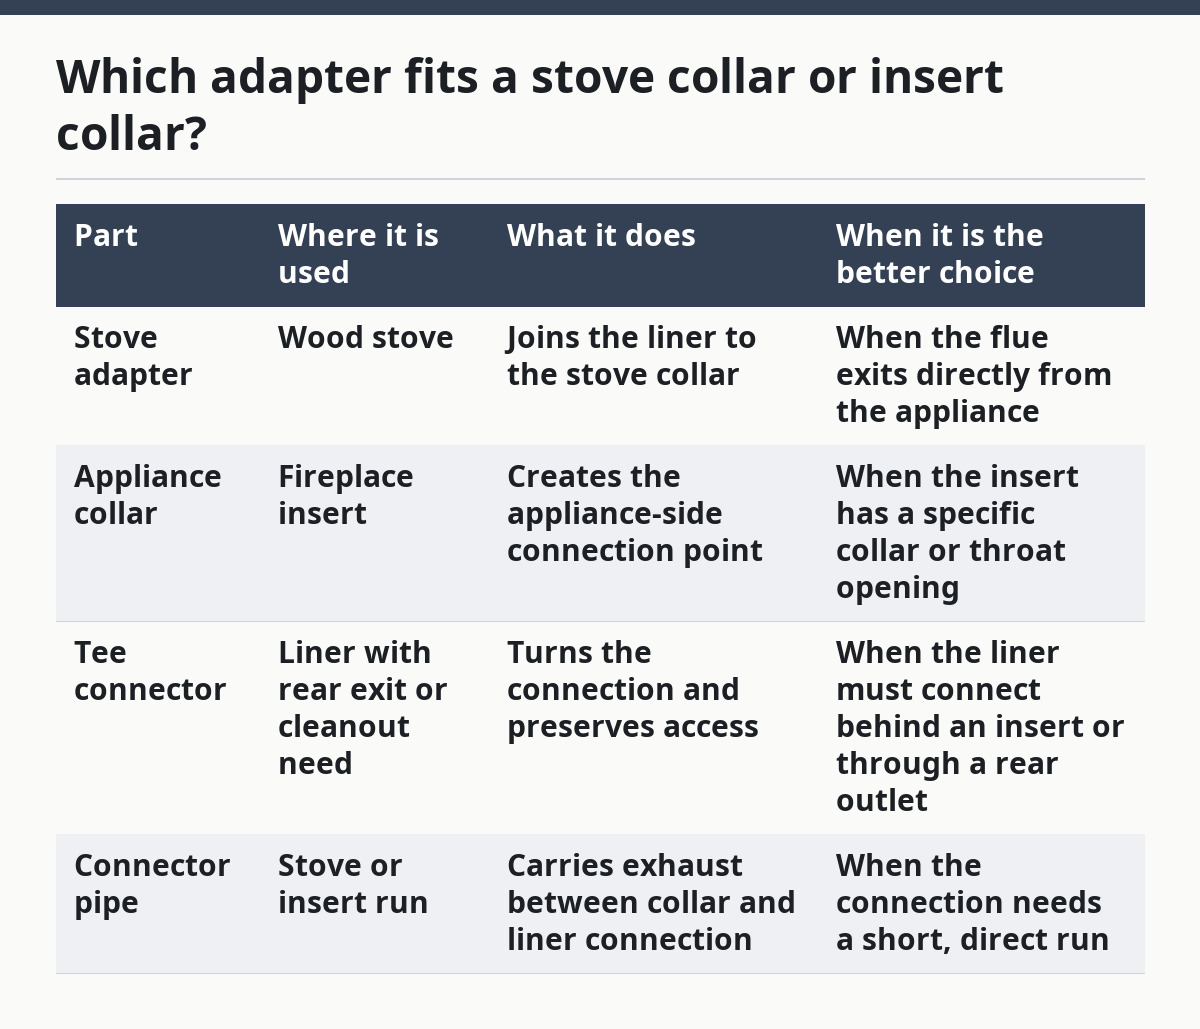
The common mistake is buying the first part that looks close. A 90-degree turn, a narrow collar, or a rear-exit insert can change the whole layout, and the wrong adapter often leads to a short connection that will not seat fully. If the appliance has a tee arrangement, the tee connector is part of the system, not an optional add-on.
For installation and sizing context, the hub at chimneylinerguide.com installation and sizing covers the upstream work that comes before this connection.
Where does the tee connector go?
The tee connector goes at the point where the liner needs a turn and a service point, usually behind an insert or at the base of a vertical run with cleanout access. It lets the liner connect without a cramped, hard-to-reach bend and gives access for soot removal and inspection.
A tee is not just a bend in the pipe. The bottom leg gives the cleanout access, and the side opening connects to the appliance path. That matters when the insert sits deep in the fireplace or when the flue path does not line up directly with the stove collar.
A bad tee setup usually leaves the cleanout hard to reach or forces the connector pipe to sit under stress. That can pull the joints out of alignment over time. A good setup leaves enough room to remove the cap, inspect the joint, and service the liner without dismantling the whole appliance side.
When the liner is already in place, the tee should line up cleanly with the appliance connection before the final screws go in. If the parts must be twisted hard to meet, the fit is wrong and the joint will likely move later.
What sealant should go on the connection?
Use the sealant specified for the liner system and appliance joint, and use it only at the joint where the manufacturer expects it. Sealant is there to close small gaps at the metal-to-metal connection, not to hold a loose adapter together or fix a crooked pipe run.
This is where many jobs go wrong. Too much sealant can squeeze into the flow path and make cleanup harder. Too little can leave a pinhole that leaks smoke or odor into the room. The cleaner approach is a tight mechanical fit first, then a thin, even seal where the parts meet.
A good seam usually looks even all the way around, with no blobs, cracks, or open edges. If the liner connection is meant to be removable for service, do not bury the whole joint in sealant. The next service call will be harder than it needs to be.
Use a small bead, then assemble the parts once. If you need to take the joint apart and rebuild it three times, stop and recheck the adapter choice. A part mismatch is cheaper to solve than a sealed-up bad fit.
How do you check cleanout access and the final fit?
You check cleanout access and the final fit by making sure the cap, tee, and connector can all be reached without moving the stove or insert. The connection should feel solid, sit straight, and leave enough room for future cleaning and inspection.
A final fit check should cover three things: the liner is supported, the joint is not under strain, and the cleanout opening is usable. If the cleanout access is buried behind stone, trim, or the appliance body, the job is only half done.
Look for smoke stains, loose screws, or a connector pipe that has shifted after the stove warms up. Those are signs that the connection was forced into place. A good fit does not rely on the door gasket, the stove body, or the surround panels to hold the liner in position.
This is also the point to decide whether the job belongs to the installer or to a sweep or chimney professional. If the collar area is hard to reach, the tee will not seat, or the liner path does not match the appliance opening, the safer move is to stop and have the connection checked before firing the stove. For that check, the NFPA 211 chimney and vent standard is the main reference point, and EPA Burn Wise also recommends following the appliance manufacturer’s instructions and local code requirements.
What does a bad connection look like?
A bad connection looks like a joint that is loose, offset, stained, or hard to service. Smoke odor, black streaks at the collar, visible gaps, and a tee cap that cannot be removed without force are all signs the fit is wrong.
The cost of a bad connection is not just rework. A poor joint can make the stove draw worse, load the room with odor, and turn future cleaning into a much bigger job. In a fireplace insert, a cramped connection can also make the appliance hard to pull for service later.
The most common errors are easy to name. A wrong adapter leaves a gap. Too much sealant hides the gap instead of fixing it. A connector pipe cut too short pulls the joint apart. A tee installed without enough cleanout room becomes a service problem the first time the liner needs attention.
The better choice is usually the simpler one: use the part that matches the collar, keep the run short, and leave the cleanout reachable. If the parts do not line up, forcing them together is the wrong move. The Chimney Safety Institute of America (CSIA) also warns that chimney and vent connections should be matched and inspected by a qualified professional when fit is uncertain.
How long and how much does the connection part of the job take?
The connection part of the job usually takes less time than the liner run itself, but the exact time depends on the adapter, the stove collar, and whether the setup uses a tee connector. A straightforward collar-to-collar connection is faster than a rear-entry insert with cleanout access to manage.
Cost also changes with the parts, not just the labor. A stove adapter, appliance collar, tee, connector pipe, and sealant all affect the final bill, and a more awkward fit usually means more labor. A job with a straight appliance connection is simpler than one that needs a tee and extra alignment.
The cheapest-looking option is not always the least expensive job overall. If the adapter is wrong, the installer may spend more time reworking the connection than if the correct part had been chosen first. That is why the collar type and the liner end matter before the connection is started.
For a reader planning who to call, the useful question is not “What is the cheapest connection?” It is “Who can match the right adapter, leave the cleanout access reachable, and finish the joint without forcing the pipe?” That question matters more than a low number on paper.
What should you ask before hiring someone?
Ask whether the person will match the stove collar or insert collar to the adapter before the liner is fastened, and ask how the cleanout access will stay reachable. Those two questions tell you whether the person understands the connection as a system, not just as a piece of pipe.
Ask what happens if the tee connector does not line up as planned. A careful answer should mention dry-fitting, the correct adapter, and a final check of the joint before sealant is applied. Ask how the connector pipe will be secured and what the final seam should look like, and consult a chimney or stove professional if the answer is vague or if the liner system instructions are not clear.
You can also ask what would count as a bad fit. The answer should mention gaps, wobble, and a tee that cannot be serviced. If the reply is vague or skips over the collar and adapter details, that is a warning sign.
This is not a job for guesswork. The parts are small, but the connection decides how the stove or insert breathes, how easy it will be to service, and whether the installation feels finished.
How do you connect a liner to a stove?
You connect it by matching the liner to the right stove adapter, then fastening that adapter to the stove collar with the connector pipe and the right sealant. The fit should be snug, straight, and easy to service later. If the parts do not line up without force, the adapter choice is wrong.
What adapter do I need for a chimney liner?
You need the adapter that matches the appliance collar and the liner end. A wood stove often uses a stove adapter, while a fireplace insert may need an appliance collar or tee connector. The right part depends on the stove’s outlet, the insert’s layout, and whether cleanout access must stay open.
How do you seal a liner connection?
You seal the joint with the sealant specified for that liner system and appliance connection, then assemble the parts tightly. The sealant should close the joint, not replace a poor fit. A thin, even bead is better than a heavy layer that hides a gap or gets squeezed into the flow path.
Drafted with AI; not yet reviewed by a person.

Related Posts
How to Measure a Chimney for a Liner
How to Insulate a Chimney Liner
One thought on “How to Connect a Chimney Liner to a Stove or Insert”