How to Inspect a Chimney Liner for Damage
Last updated: November 15, 2026
Quick answer: a basic chimney liner inspection should take about 30 minutes and should check the top, the bottom, and the joints for cracks, corrosion, warping, separation, and water stains. This guide on how to inspect a chimney liner for damage shows you how to check the flue from the top and the bottom with a flashlight, a mirror, and, if needed, an inspection camera. Start with the chimney crown outside, then look down the flue and up from the firebox or appliance opening so you can spot damage before it turns into a bigger repair. For background, see the chimney-liner maintenance and safety hub, NFPA 211, and the Chimney Safety Institute of America.
Key takeaways
- Look at both ends of the liner, not just the opening you can reach first.
- A flashlight and a small mirror can reveal cracks, rust, and shifted joints in plain view.
- Water marks, loose debris, and a damaged crown often point to liner trouble above the firebox.
- An inspection camera helps with bends and dark sections, but it does not replace a careful visual check.
- If you find warping, separation, or heavy corrosion, stop treating it as a simple maintenance task and consult a qualified chimney professional; NFPA 211 calls for regular inspection and maintenance.
What should I look for first?
First, look for the four main warning signs: cracks, corrosion, warping, and joint separation. These are the defects that most often show up during a basic chimney liner inspection and they can be seen with ordinary light if the liner is accessible enough.
A quick scan works best when you know what each sign looks like. Cracks usually appear as thin lines in clay tile, splits in metal, or broken edges at a seam. Corrosion looks like pitting, flaking, or orange-brown rust on metal liners. Warping shows as bent, misshapen, or bulging sections. Joint separation appears when one section no longer sits tight against the next. If you are unsure whether a crack or chip is minor, consult a professional chimney sweep or inspector before using the system again.
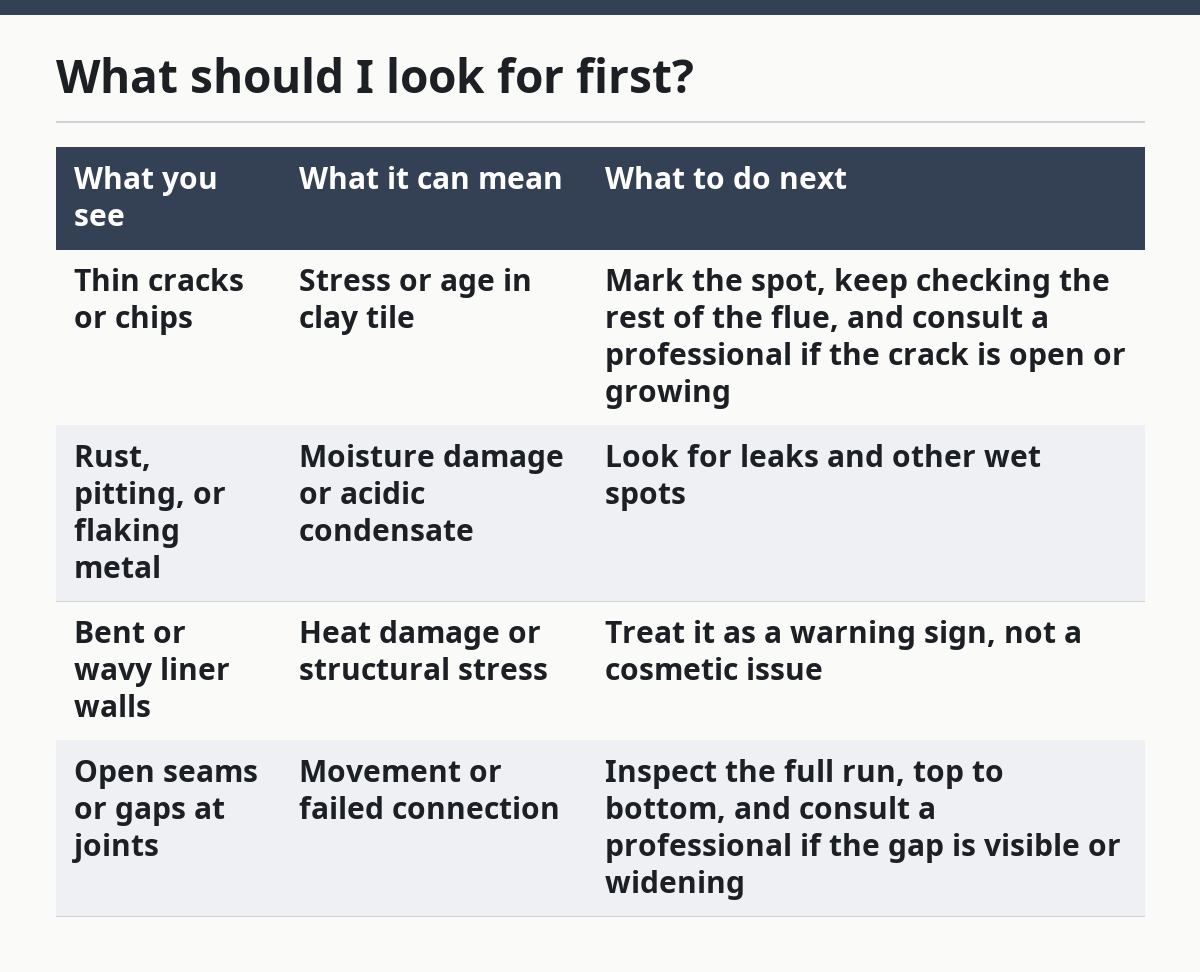
| What you see | What it can mean | What to do next |
|---|---|---|
| Thin cracks or chips | Stress or age in clay tile | Mark the spot, keep checking the rest of the flue, and consult a professional if the crack is open or growing |
| Rust, pitting, or flaking metal | Moisture damage or acidic condensate | Look for leaks and other wet spots |
| Bent or wavy liner walls | Heat damage or structural stress | Treat it as a warning sign, not a cosmetic issue |
| Open seams or gaps at joints | Movement or failed connection | Inspect the full run, top to bottom, and consult a professional if the gap is visible or widening |
The easiest mistake is staring only at the visible opening and missing the rest of the liner. A liner can be damaged 12 feet higher up and still look fine at the base. If you are checking a straight run, use a mirror or camera to inspect the full length in sections rather than guessing from one look. For more on visual checks, the chimney inspection overview can help you keep the bigger picture straight without mixing repair steps into this inspection guide.
How do you inspect a chimney liner?
You inspect a chimney liner by checking the chimney crown, the top of the flue, the visible liner surfaces, and the bottom connection with a flashlight, mirror, and inspection camera. The goal is not to clean or fix anything here; the goal is to spot visible damage before you call for help. NFPA 211 and CSIA both stress regular inspection rather than guessing from one view.
-
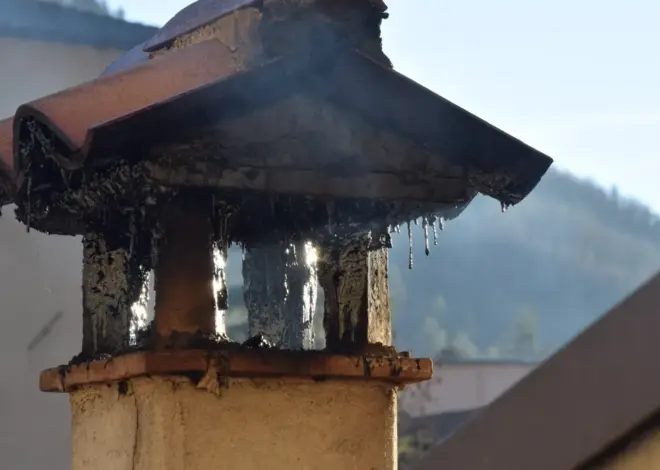
Check the chimney crown with a flashlight from outside and look for cracks, missing mortar, or pooled water. A damaged crown often sends water into the flue, and that water can leave stains or corrosion inside the liner.
-
Look down the flue with a flashlight from the top access point or the opening you can safely reach. You want a continuous surface, not broken edges, dark streaks, or areas that look rough and uneven.
-
Use a mirror to inspect the far side of the liner where the flashlight beam does not reach. A small mirror helps you see the back wall of the liner and the places most people miss on a straight 8-foot or 10-foot look.
-
Scan for joint separation along the liner where one section meets the next. Gaps, offset edges, or loose-looking seams can signal movement that needs a closer inspection.
-
Check the liner for corrosion or discoloration from top to bottom. Orange rust, white powdery residue, or dark staining can point to moisture damage or long-term wear.
-
Inspect the base connection at the firebox or appliance opening. Look for broken tile, damaged metal edges, loose mortar, or debris that has fallen from above.
-
Use an inspection camera for bends or dark runs if the liner turns, narrows, or disappears behind masonry. A camera is especially useful when a mirror only shows the first few feet and the rest of the flue stays in shadow.
A careful inspection should take place in daylight if you are working from the roof, because a dark roof edge and a dim flue make small cracks easy to miss. If you cannot get a clear view after a few minutes, that is a sign to stop and use better access rather than forcing a guess.
What does damage look like inside the flue?
Damage inside the flue usually shows up as visible cracks, rust, warped sections, missing pieces, or wet staining on the liner walls. The shape of the damage often tells you which problem is present, even before you know the cause.
A clay liner with damage often shows narrow cracks, missing chips, or sections that have shifted out of line. A metal liner may show pitting, flaking, discoloration, or a section that no longer holds its shape. In both cases, water damage often leaves a trail: streaks, stains, damp mortar, or a musty patch near the base.
The table below gives a simple way to separate what you are seeing from what it may mean.
| Visible sign | Common look | Why it matters |
|---|---|---|
| Crack | Thin line or open split | Can widen with heat and movement |
| Corrosion | Rust, pitting, or flaking | Weakens metal and can point to moisture |
| Warping | Curved, bulged, or bent wall | Suggests heat stress or failed support |
| Joint separation | Gap between sections | Lets gases, heat, or moisture escape |
| Water damage | Stain, damp patch, or efflorescence | Often tied to crown leaks or roof leaks |
A damaged liner is not always dramatic. A few hairline cracks can be easy to ignore, but they matter because the liner is the path that carries heat and combustion products. If the damage is visible in one section, check the next section on both sides of that spot, since damage often spreads along the same line.
How do you inspect a chimney liner from the top and bottom?
You inspect a chimney liner from both ends because one angle hides what the other reveals. The top shows crown leaks, surface cracks, and open joints near the upper flue, while the bottom shows falling debris, broken tile edges, and damage around the appliance opening.
At the top, look first at the chimney crown and the upper 2 to 3 feet of liner if you can reach them safely. Water often enters from above, so stains and rust are common near that area. At the bottom, aim a flashlight upward from the firebox or appliance opening and look for broken edges, loose pieces, or anything hanging into the flue.
This two-sided check matters because a liner can look fine from one end and damaged from the other. A small crack near the top may be invisible from below, and a collapsed edge near the base may not be obvious when you only inspect from the roof. If the chimney has a bend or offset, an inspection camera becomes the better tool because mirrors cannot follow curves well.
Do not treat a quick glance as a full inspection. A 30-second look at one opening can miss a hidden split, a shifted joint, or a wet stain that only appears when light hits it at the right angle. If you are unsure, repeat the check with the light from a different side before deciding the liner is sound, and consult a professional if the picture still does not make sense.
What tools help most during inspection?
A flashlight, a mirror, an inspection camera, and a steady ladder or roof access setup help most during a chimney liner inspection. These tools are simple, but each one solves a different visibility problem.
A flashlight gives you direct light and makes cracks and stains stand out. A mirror lets you see the back side of a liner or a spot around a corner. An inspection camera is useful for long flues, offsets, and dark sections where your eye cannot follow the whole run. Roof access gear matters because a stable position makes the inspection more accurate and less rushed.
The table below shows what each tool does best.
| Tool | Best use | Limit |
|---|---|---|
| Flashlight | Brightening cracks, rust, and stains | Hard to see around bends |
| Mirror | Viewing hidden sides of the liner | Limited in dark or narrow spaces |
| Inspection camera | Checking long or angled flues | Needs clear handling and a good angle |
| Ladder or roof access setup | Reaching the crown safely | Not a viewing tool by itself |
A camera is helpful, but it is not magic. It can show you more detail than a mirror, yet a dirty lens, a weak light, or a shaky hand can hide small defects. Use the camera after your first visual check, not instead of it. If the liner is badly blocked by debris or soot, the camera view may be too limited to trust.
When should you stop and call a pro?
You should stop and call a pro when you see warping, major corrosion, open joint separation, broken tile, or water damage that keeps returning after a dry spell. Those signs point beyond a simple visual check and into repair territory.
This is the part of chimney liner inspection where honest limits matter. A homeowner can spot warning signs with a flashlight and mirror, but that does not mean the liner is safe to keep using. Damage in a liner can hide behind a bend, behind a soot layer, or above the first accessible section. If the chimney crown is cracked and the liner is stained, the problem may be coming from two places at once.
The same caution applies if the liner is hard to access. A tall flue, a steep roof, a narrow opening, or a dark offset makes a basic inspection unreliable. In those cases, the cost of missing damage is higher than the cost of getting a fuller inspection. If the liner is already showing broken edges or visible gaps, do not keep firing the system just to “see what happens.” That is the wrong test for this job.
A simple rule helps: if the damage changes the shape of the liner, affects the joints, or points to water, consult a professional and stop treating it as a routine check. A cracked surface may be a note for later, but a warped or separated liner is a different level of problem.
What should I do after I inspect it?
After you inspect it, write down what you saw, where you saw it, and whether the problem is at the crown, mid-flue, or base. A short note with 3 details is enough to help a professional understand the issue later.
Take clear photos if you can do so safely. A picture of a cracked crown, a corroded section, or a separated joint is more useful than memory alone, especially if you need to compare the same area after a storm or another season of use. Keep the note with the date and the tool you used, such as flashlight, mirror, or inspection camera.
If you found no visible damage, that does not mean the liner should be ignored until the next obvious problem. Hidden cracks and leaks can develop between checks, especially after water exposure or heat stress. If you want the broader maintenance picture, the chimneylinerguide.com maintenance, repair, and safety hub is the right place to continue after this inspection guide.
How do you inspect a chimney liner?
You inspect a chimney liner by checking the crown, the flue walls, the joints, and the base with a flashlight, a mirror, and, when needed, an inspection camera. The goal is to find visible cracks, corrosion, warping, separation, and water damage before they become larger problems.
Work from both the top and the bottom if possible. That gives you two views of the same liner and helps you spot damage a single angle can miss. NFPA 211 and CSIA both recommend inspection and maintenance as part of regular chimney care.
What does a damaged chimney liner look like?
A damaged chimney liner usually looks cracked, rusted, warped, separated at the joints, or stained by water. Clay tile may show chips or open splits, while metal may show pitting, flaking, or bent sections.
Water damage often leaves dark stains or white residue, and those marks may sit near the crown or the base. Any change in shape or connection deserves a closer look, especially if the stain keeps returning after the chimney dries.
When should a chimney liner be inspected?
A chimney liner should be inspected whenever you see staining, rust, cracks, or a damaged chimney crown, and also when the flue is hard to use or hard to see clearly. If the liner has a visible defect, do not wait for the next season to check it again.
A 30-minute visual check is often enough for a basic homeowner inspection, but a hidden or angled flue may need a camera and better access. If the damage is more than cosmetic, it is time to stop relying on a quick look. Annual inspection is a sensible baseline, and NFPA 211 is the standard often used for that level of care.
FAQ
Can I inspect a chimney liner without climbing on the roof?
Yes. You can inspect some of the liner from the firebox or appliance opening with a flashlight and mirror. However, the top of the flue and the chimney crown usually need roof access or a camera to check properly.
How often should a chimney liner be checked?
A chimney liner should be checked at least once a year, which matches the regular inspection approach used in NFPA 211. If you see water stains, rust, or a damaged crown, inspect it sooner.
What is the most common sign of liner damage?
Cracks, corrosion, and joint separation are the most common visible signs. Water stains often show up too, and they can point to leaks above the firebox or appliance opening.
When should I stop the inspection and call a professional?
Stop if you find warping, major corrosion, open gaps, broken tile, or repeated moisture. If the liner changes shape or the joints are no longer tight, a professional inspection is the safer next step.
Drafted with AI; not yet reviewed by a person.

Related Posts
What causes a chimney liner to fail
Chimney Liner Safety Rules You Should Know
One thought on “How to Inspect a Chimney Liner for Damage”